

How To Run Tomcat As A Service Ubuntu
How to Install and Configure Apache Tomcat ix on Ubuntu 20.04 LTS
Apache Tomcat is an open up-source Coffee Servlet implementation adult by the Apache Software Foundation. In improver to being a Java Servlet container, Tomcat supports other Java server technologies too, including JavaServer Pages (JSP), Coffee Expression Language, and Java WebSocket.
The Apache Tomcat provides an HTTP Spider web Server for Java applications that supports HTTP/ii, OpenSSL for JSSE, and TLS virtual hosting.
In this tutorial, we will show you how to install and configure Apache Tomcat nine.0.34 with the Java OpenJDK 11 on the latest version of ubuntu twenty.04 Server.
Prerequisites
For this tutorial, we will install the Apache Tomcat on the Ubuntu 20.04 Server with 1 GB of RAM, 25 GB costless disk space, and 2 CPUs.
What we will do?
- Install Java OpenJDK
- Setup JAVA_HOME Environment variable
- Download and Install Apache Tomcat nine.0.34
- Setup Apache Tomcat equally a Systemd Service
- Setup Apache Tomcat Hallmark
- Testing
Step 1 - Install Coffee OpenJDK
First, we will install the Java OpenJDK packages to our Ubuntu xx.04 Server.
By default, the latest Ubuntu xx.04 repository provides multiple Coffee versions, including the OpenJDK 11.
Update all repository on your organisation and install Java OpenJDK 11 using the apt command equally below.
sudo apt update
sudo apt install default-jdk
In one case all installation is completed, bank check your Java version every bit beneath.
coffee -version
Below is the response you will go.
openjdk version "11.0.7" 2020-04-14
OpenJDK Runtime Surround (build eleven.0.seven+10-post-Ubuntu-3ubuntu1)
OpenJDK 64-Fleck Server VM (build 11.0.7+10-postal service-Ubuntu-3ubuntu1, mixed mode, sharing)
Every bit can be seen, the Java OpenJDK eleven is now installed on the Ubuntu twenty.04 Server.
Stride 2 - Setup JAVA_HOME Surround Variable
After installing the java OpenJDK 11, we will setup the JAVA_HOME environment variable on our system.
Cheque all available Java versions on your organization using the following command.
sudo update-alternatives --config java
If y'all accept only the Java OpenJDK on your system, you lot will get the response beneath.
There is only one alternative in link group java (providing /usr/bin/coffee): /usr/lib/jvm/java-eleven-openjdk-amd64/bin/java
Nothing to configure.
If you lot're using multiple Coffee versions, choose the default java version on your surroundings.
As can exist seen, the Java OpenJDK 11 installation directory at the '/usr/lib/jvm/java-11-openjdk-amd64'.
Side by side, edit the '/etc/environment' configuration using the vim editor.
vim /etc/surroundings
Paste the following configuration into information technology.
JAVA_HOME="/usr/lib/jvm/java-11-openjdk-amd64"
Relieve and shut.
Next, edit your '~/.bashrc' config file.
vim ~/.bashrc
Add the post-obit environment variable into it.
export JAVA_HOME=/usr/lib/jvm/java-11-openjdk-amd64
export PATH=$JAVA_HOME/bin:$PATH
Relieve and close.
Now reload your '~/.bashrc' configuration and bank check the 'JAVA_HOME' environment variable.
source ~/.bashrc
repeat $JAVA_HOME
Below is the result you will go. Ad
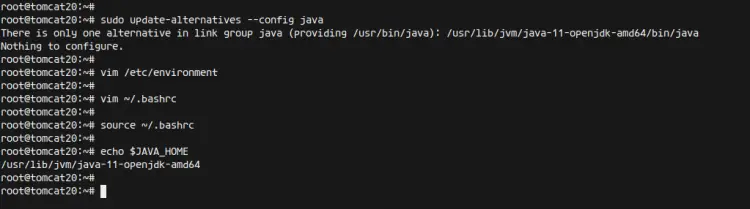
As a result, th 'JAVA_HOME' environment variable has been created, located at the Java OpenJDK 11 installation directory '/usr/lib/jvm/coffee-11-openjdk-amd64'.
Step 3 - Install and Configure Apache Tomcat
In this step, we will download and install the Apache Tomcat 9.0.34. The Apache Tomcat will be running nether the user 'tomcat' at the '/opt/tomcat' directory.
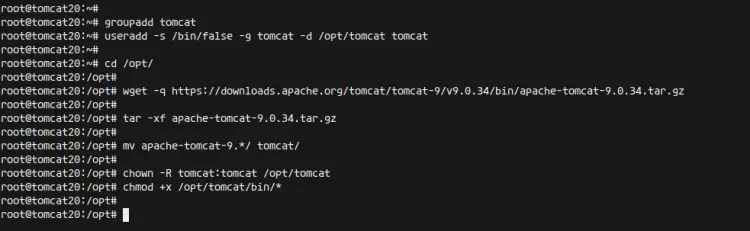
Create a new user and group named 'tomcat' using the control beneath.
groupadd tomcat
useradd -s /bin/imitation -yard tomcat -d /opt/tomcat tomcat
Adjacent, go to the '/opt/' directory and download the Apache Tomcat using the wget command below.
cd /opt/
wget -q https://downloads.apache.org/tomcat/tomcat-nine/v9.0.34/bin/apache-tomcat-9.0.34.tar.gz
Once it'south downloaded, extract the Apache Tomcat binary file and rename the directory to 'tomcat'.
tar -xf apache-tomcat-9.0.34.tar.gz
mv apache-tomcat-9.*/ tomcat/
Next, alter the ownership of the '/opt/tomcat' directory to the user 'tomcat'.
chown -R tomcat:tomcat /opt/tomcat
chmod +ten /opt/tomcat/bin/*
The Apache Tomcat is downloaded at the '/opt/tomcat' directory.
Adjacent, nosotros will configure the Apache Tomcat 'CATALINA_HOME' surround variable, which is located at the '/opt/tomcat' directory. Advertisement
Edit the '~/.bashrc' configuration using vim editor.
vim ~/.bashrc
Paste the following configuration into information technology.
export CATALINA_HOME=/opt/tomcat
Relieve and close.
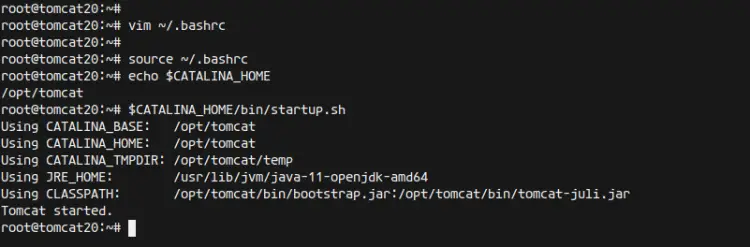
Now reload the '~/.bashrc' config file and check the 'CATALINA_HOME' environs variable.
source ~/.bashrc
repeat $CATALINA_HOME
You will get the '/opt/tomcat' equally a value of the environment variable 'CATALINA_HOME'.
Now y'all can start the Apache Tomcat manually using the following control.
$CATALINA_HOME/bin/startup.sh
Yous will get the Apache Tomcat is started.
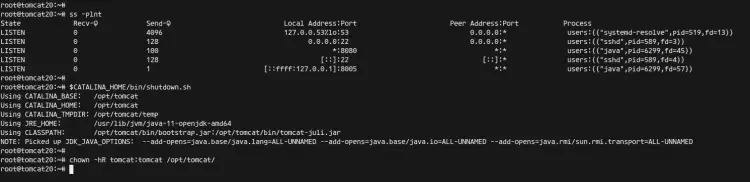
The Apache Tomcat is upwardly and running on the Ubuntu system, and it's running on default port '8080'. Cheque it using the following command.
ss -plnt
And you will become the port '8080' that is used by the Java awarding.
Now stop the Apache Tomcat and alter the buying of the '/opt/tomcat' directory to the 'tomcat' user as beneath.
$CATALINA_HOME/bin/shutdown.sh
chown -hR tomcat:tomcat /opt/tomcat/
As a result, the installation and configuration of Apache Tomcat have been completed.
Pace iv - Setup Apache Tomcat every bit a Systemd Service
For this tutorial, we will run the Apache Tomcat as a systemd service. And for this footstep, nosotros will create a new systemd service file named 'tomcat.service' for our Apache Tomcat installation.
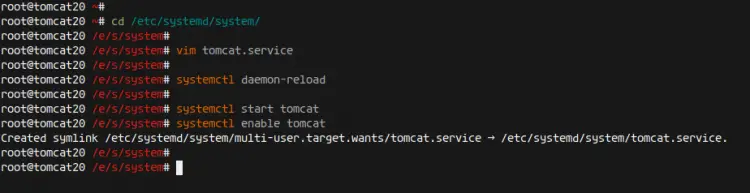
Go to the '/etc/systemd/system' directory and create a new service file 'tomcat.service'.
cd /etc/systemd/system/
vim tomcat.service
At present paste the following configuration into it.
[Unit]
Clarification=Apache Tomcat 9 Servlet Container
After=syslog.target network.target[Service]
User=tomcat
Group=tomcat
Type=forking
Environment=CATALINA_PID=/opt/tomcat/tomcat.pid
Environment=CATALINA_HOME=/opt/tomcat
Environment=CATALINA_BASE=/opt/tomcat
ExecStart=/opt/tomcat/bin/startup.sh
ExecStop=/opt/tomcat/bin/shutdown.sh
Restart=on-failure[Install]
WantedBy=multi-user.target
Save and close.
Side by side, reload the systemd manager.
systemctl daemon-reload
Now commencement the Apache Tomcat service and add information technology to the system kick.
systemctl starting time tomcat
systemctl enable tomcat
The Apache Tomcat service is upwardly and running as a systemd service, bank check information technology using the following control.
ss -plnt
systemctl status tomcat
Below is the event you volition become.
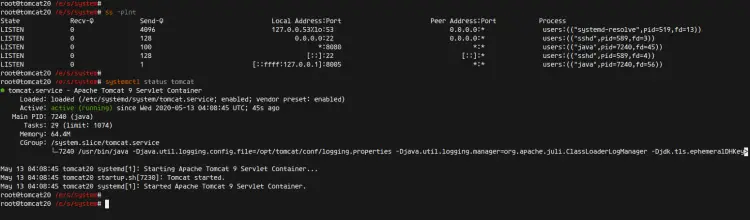
As a result, the Apache Tomcat configuration as a systemd service has been completed.
Footstep five - Enable Apache Tomcat Hallmark
In this pace, we will enable the Apache Tomcat authentication for both the manager and the host-manager.
First, go to the '/opt/tomcat/conf' directory and edit the configuration 'tomcat-users.xml.
cd /opt/tomcat/conf
vim tomcat-users.xml
Alter the username and password with your own and paste the following configuration into it.
<role rolename="manager-gui"/>
<user username="hakase" countersign="hakasepassword01" roles="manager-gui,admin-gui"/>
Save and shut.

Next, get to the '/opt/tomcat/webapps/manager/META-INF/' directory and edit the Apche Tomcat mnager configuration 'context.xml'.
cd /opt/tomcat/webapps/manager/META-INF/
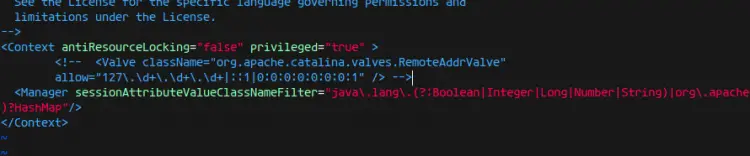
vim context.xml
Comment the following line below.
<!--  <Valve className="org.apache.catalina.valves.RemoteAddrValve"
         allow="127\.\d+\.\d+\.\d+|::ane|0:0:0:0:0:0:0:ane" /> -->
Save and close.
Next, go to the '/opt/tomcat/webapps/host-manager/META-INF/' directory nd edit the Apache Tomcat hos- managing director configuration 'context.xml'.
cd /opt/tomcat/webapps/host-director/META-INF/
vim context.xml
Comment the following line below.
<!--  <Valve className="org.apache.catalina.valves.RemoteAddrValve"
         allow="127\.\d+\.\d+\.\d+|::1|0:0:0:0:0:0:0:ane" /> -->
Salve and close.

Now restart the Apache Tomcat service using the control below.
systemctl restart tomcat
Equally a result, the Apache Tomcat authentication for manager and host-manager has been enabled.

Stride half-dozen - Testing
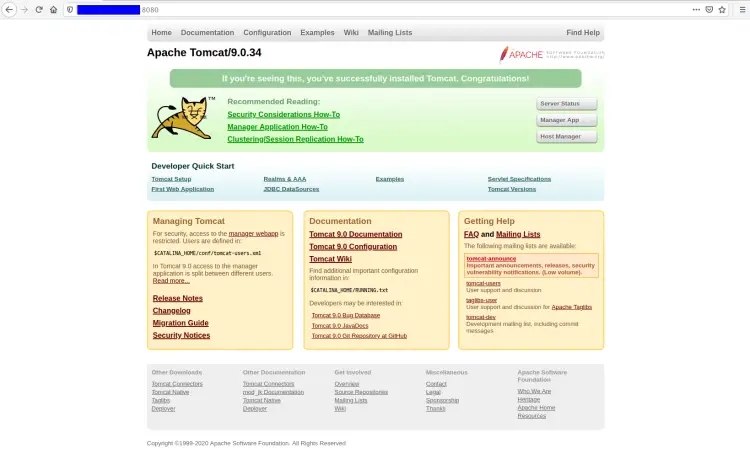
Open your spider web browser and type the server IP address with port 8080. ANd yous will come across the Apache Tomcat default index page that informs that the installation is successful.
http://x.5.v.34:8080/
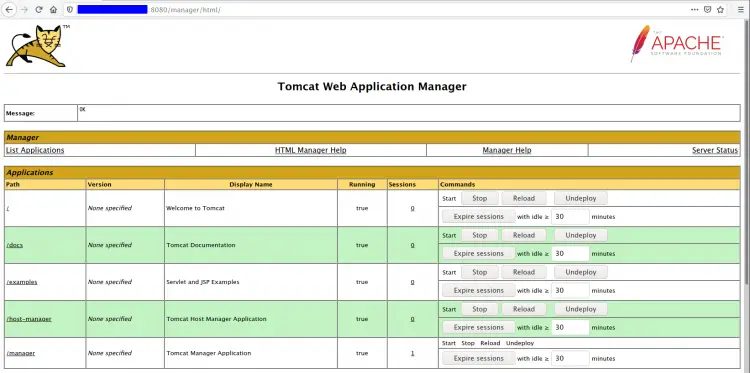
Next, add the '/manager/html' path on the URL and you volition be prompted for the Tomcat managing director authentication.
http://ten.5.5.34:8080/manager/html
Type your username and countersign, and you will go the Apache Tomcat Manager Dashboard.
Next, become to the Apache Tomcat virtualhost director '/host-manager/html'.
http://10.v.five.34:8080/host-manager/html
And you will get the Apache Tomcat virtual host manager every bit beneath.
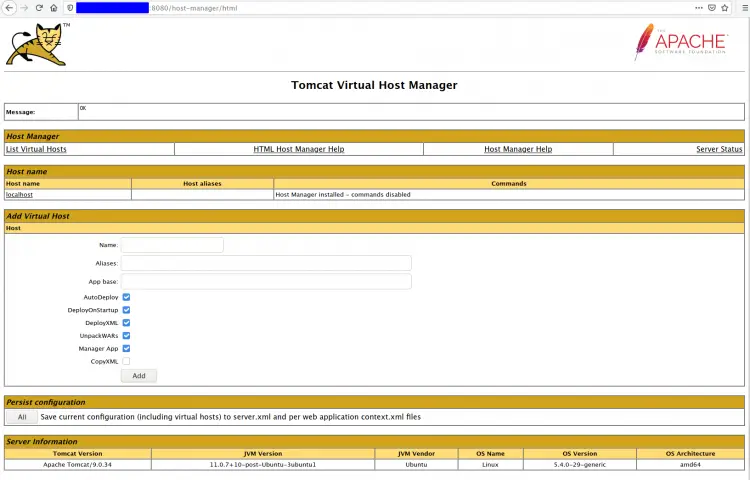
Every bit a result, the installation of Apache Tomcat on Ubuntu xx.04 has been completed successfully.
Suggested articles
This feature is merely available to subscribers. Get your subscription here.

How To Run Tomcat As A Service Ubuntu,
Source: https://www.howtoforge.com/tutorial/ubuntu-apache-tomcat/
Posted by: cobbhatien.blogspot.com
0 Response to "How To Run Tomcat As A Service Ubuntu"
Post a Comment